 Pin It
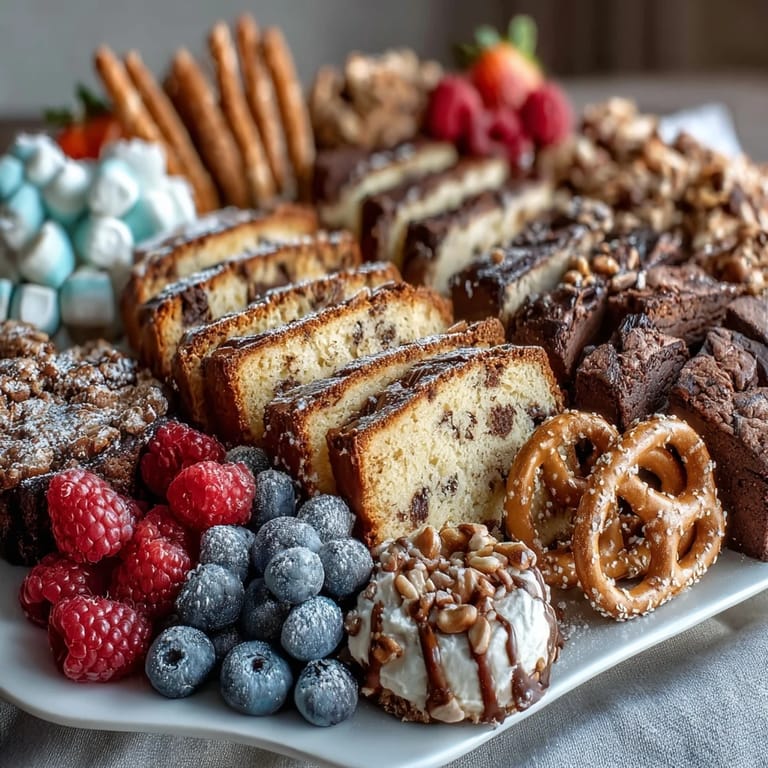
 If you ever catch a whiff of vanilla and chocolate mingling together, you'll know why the dessert board is my favorite contribution at graduation parties. I remember hearing the happy chatter echoing around as I carried a tray brimming with cake slices, cookies, and brownie bites—the kind of sweets that spark instant smiles. There’s an art to assembling a board that feels festive but never fussy, and every time I make one, it’s a fun shuffle of flavors and colors. I love how the simple act of arranging treats transforms them into something special without a single formal recipe. This board became my go-to when I realized desserts could be both gorgeous and easy.
The first time I brought this dessert board to my cousin’s graduation, my little niece helped me sprinkle powdered sugar over the brownies, giggling at the 'snow.' Sweets disappeared so quickly that I wondered if I’d made enough, and even the adults circled back for seconds. The best part was seeing the colors of the summer berries pop against the cakes, like a painter’s palette gone edible. Everyone had their signature cookie and the board was empty by the end of the night. It’s the only dessert I’ve made that caused a spontaneous round of applause.
Ingredients
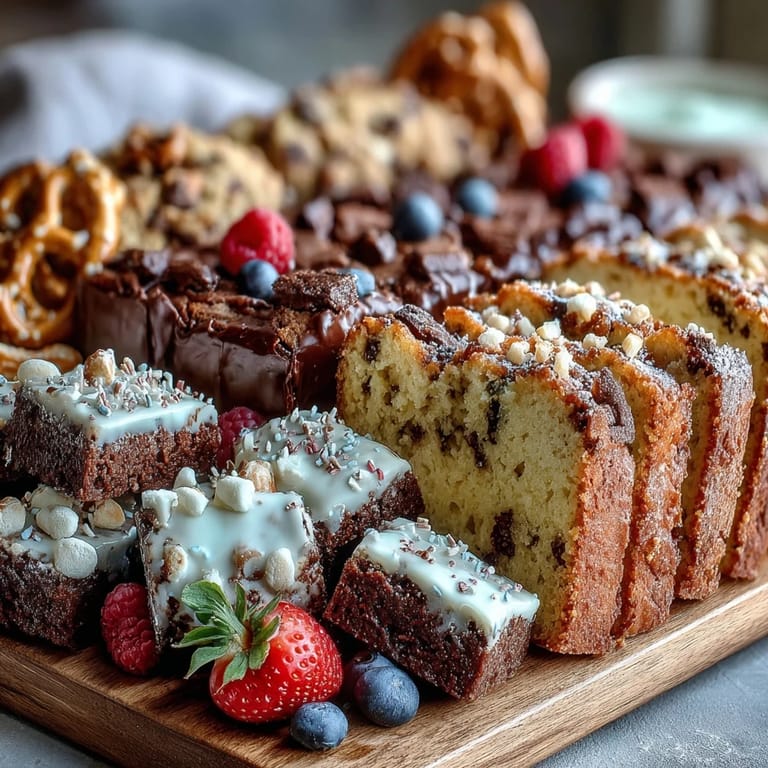
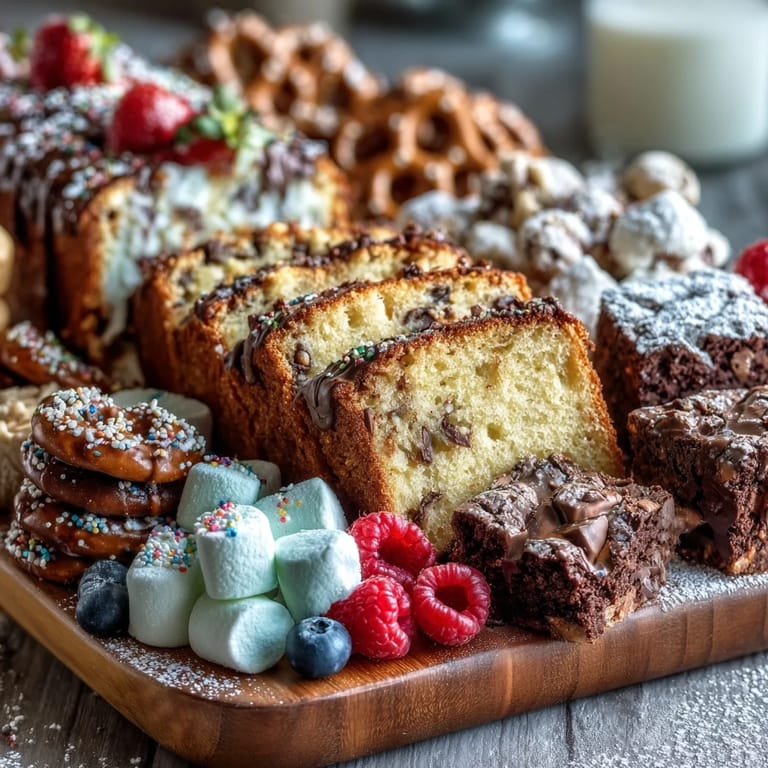
- Pound Cake (1 loaf): I like a store-bought loaf for ease, but homemade gives a buttery richness—the key is slicing with a sharp knife for clean pieces.
- Lemon Loaf Cake (1 loaf): Its tangy citrus adds brightness; let it cool completely before slicing so you get sharp edges.
- Fresh Strawberries (1/2 cup): They’re sweet and juicy; toss lightly before scattering for extra shine.
- Chocolate Chip Cookies (12): Classic comfort, and arranging them in stacks keeps the board inviting and tidy.
- Sugar Cookies (12): Their simple sweetness balances richer bites—choose shapes or sprinkles to match the occasion.
- Oatmeal Raisin Cookies (12): The chewy texture and subtle spice give a nice rustic touch; make sure they’re cool when stacking.
- Brownie Bites (1 batch, cut into 1-inch squares): Fudgy or cakey, brownies are irresistible—dusting with powdered sugar makes them festive.
- Fresh Raspberries (1/2 cup): Bursting with color, they fill gaps and add tartness.
- Blueberries (1/2 cup): For pops of deep blue, scatter them between larger sweets.
- Mini Marshmallows (1/2 cup): Soft clouds for texture contrast—the kids reach for these first.
- Chocolate-Covered Pretzels (1/2 cup): Salty-sweet crunch pairs beautifully with the cakes and cookies.
- Powdered Sugar (1/4 cup): A delicate dusting transforms brownies and cakes into party-ready treats.
- Assorted Sprinkles (1/4 cup, optional): Adds flair and a sense of celebration; sprinkle lightly just before serving for best results.
Tired of Takeout? 🥡
Get 10 meals you can make faster than delivery arrives. Seriously.
One email. No spam. Unsubscribe anytime.
Instructions
- Prep Your Board:
- Set out a large platter or board, making sure it’s clean and dry before you begin. Lay out all your cakes, cookies, brownies, and garnishes nearby, so assembling feels effortless.
- Bake or Buy Treats:
- If baking from scratch, get your cakes, cookies, and brownies done ahead so they can cool fully—that way, slicing is easy and neat.
- Slice and Arrange Cakes:
- Slice loaves evenly and arrange slices in a fanned pattern at one edge; the strawberries make a pretty garnish and bring brightness.
- Stack Cookies:
- Create little piles mixing cookie types for visual appeal—leave some overlapping and some separated for contrast.
- Prepare Brownie Bites:
- Cut brownies into squares, dust lightly with powdered sugar, and stack them in rows or a heap to invite grabbing.
- Add Garnishes:
- Fill empty spots with fresh raspberries, blueberries, mini marshmallows, and chocolate-covered pretzels so there’s color and texture everywhere.
- Finish With Sprinkles:
- Scatter sprinkles over cakes and cookies for the final festive touch; you’ll see instantly how it brightens the board.
- Serve or Store:
- Cover and refrigerate if prepping ahead, then bring it to room temperature before serving—everything tastes better when the flavors have time to shine.
 Pin It
 One graduation, someone asked if I’d brought “just store-bought cakes”—and their surprise when they tasted the lemon loaf was priceless. The board became more than dessert that night; it felt like an edible centerpiece, sparking laughs and conversations as everyone swapped favorite flavors. Whether you’re celebrating big milestones or small wins, this board turns dessert into a collective moment.
Dessert Board Assembly Tricks
I learned that starting near the edges helps anchor the board—lay your cake slices first, then stack cookies and brownies toward the center. Little bowls for berries and marshmallows are handy if you want to keep things tidy. Sprinkling powdered sugar last ensures it doesn’t melt into the cakes, especially if the board sits out for a while.
Make It Your Own
Swap out any treat for what you love—macarons, mini cupcakes, or even candy give the board a personal twist. Since everyone has their favorite, offering a mix means nobody feels left out. Pairing with coffee, tea, or sparkling juice turns the board into a complete dessert spread without any extra fuss.
Finishing Touches That Wow
I always check for gaps once everything’s arranged, filling them with berries or pretzels for pops of color and crunch. If you’re assembling ahead, cover with wrap to keep everything fresh and avoid moisture loss. To keep brownies chewy, let them cool uncovered before slicing, then dust with sugar just before serving.
- Leave a few sprinkles to scatter at the very last minute for sparkle.
- Give each cookie a tiny space so nothing looks cramped.
- Remember: half the fun is setting out the board with friends before the guests arrive.
 Pin It
 No matter how simple the sweets, a well-built dessert board makes every celebration feel joyful. I hope your next gathering is as sweet as the smiles these treats inspire.
Recipe FAQs
- → How do I assemble the dessert board for maximum visual appeal?
Arrange cake slices in a fan pattern, alternate cookie types in stacked piles, and scatter brownie bites in small piles. Fill gaps with fresh berries and festive garnishes.
- → Can I customize the dessert board with different treats?
Absolutely! Swap in favorite cake flavors or cookies. Add extras like macarons, candy, or chocolate truffles for more variety.
- → What is the best way to serve and store the dessert board?
Serve immediately for freshness. If preparing ahead, cover and refrigerate. Bring to room temperature before serving for best texture and flavor.
- → Are there vegetarian and gluten-free options?
Yes, use vegetarian ingredients. For a gluten-free board, choose gluten-free cakes, cookies, and brownies. Always check labels for allergens.
- → What can I pair with this dessert board?
Coffee, tea, or sparkling juice make great accompaniments, creating a complete dessert spread for guests.
- → What tools do I need for assembling the board?
A large serving board or platter, a sharp knife for slicing, and small bowls for toppings help with presentation and serving.